Holistic Measurement in the Sheet-Bulk Metal Forming Process with Fringe Projection

Article Preview

Abstract:

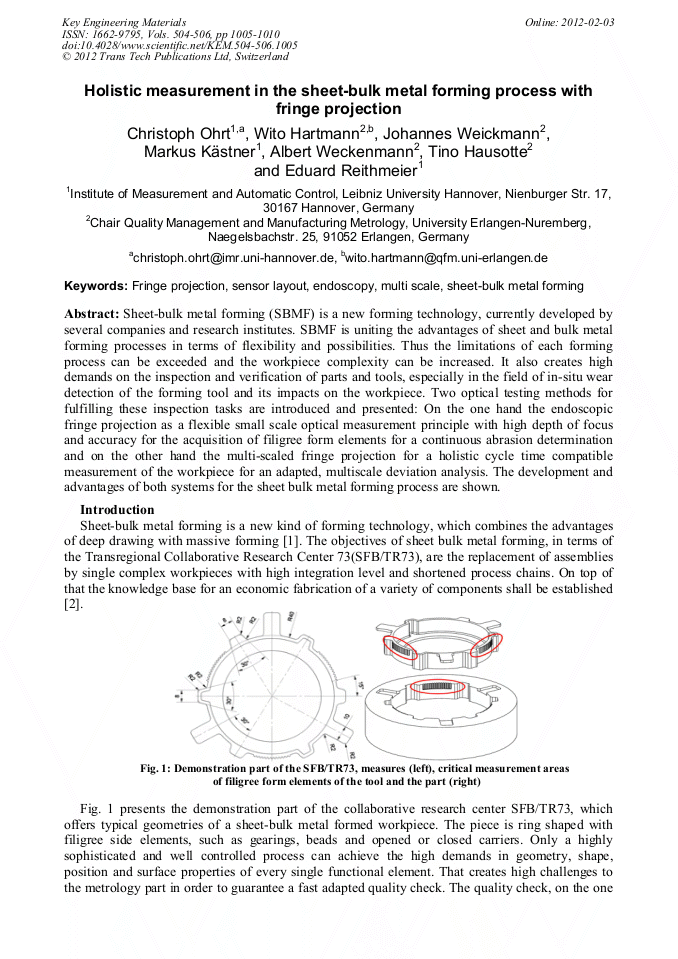
Sheet bulk metal forming is a new forming technology, currently developed by several companies and research institutes. It creates high demands on the inspection of parts and tools, especially in the field of in-situ abrasion detection of the forming tool and its impacts on the work piece. This manuscript introduces two optical testing methods for fulfilling these inspection tasks: On the one hand the endoscopic fringe projection as a flexible small scale optical measurement principal with high depth of focus and accuracy for the acquisition of filigree form elements for a continuous abrasion determination and one the other hand the multi-scaled fringe projection for a holistic one shot measurement of the work piece for an adapted, multiscale deviation analysis. The development and advantages of both systems for the sheet bulk metal forming process are shown as well as potentials of the combination of the both systems close to the proposed application next to the production line.

You might also be interested in these eBooks

Info:

Periodical:

Key Engineering Materials (Volumes 504-506)

Pages:

1005-1010

Citation:

Online since:

February 2012

Export:

Price:

Permissions CCC:

Permissions PLS:

Сopyright:

© 2012 Trans Tech Publications Ltd. All Rights Reserved

Share:

Citation:

[1] S. Wartzack; H. Hetzner; S. Röhner: Neuer Sonderforschungsbereich/Transregio angelaufen, ZWF 105, 2010.

Google Scholar

[2] U. Vierzigmann; M. Merklein; U. Engel: Tailored Surfaces in Sheet-Bulk Metal Forming, Nice, France, 2010.

Google Scholar

[3] Breuckmann, B.: Bildverarbeitung und optische Meßtechnik in der industriellen Praxis. Bobingen, Franzis, (1993)

Google Scholar

[4] Kästner M.: Optische Geometrieprüfung präzisionsgeschmiedeter Hochleistungsbauteile. Dissertation, Leibniz Universität Hannover, 2008.

Google Scholar

[5] Weickmann, J.: Assistenzsystem für die Prüfung von Blechbauteilen mit Mehrkomponenten-Streifenprojektionssystemen unter Anwendung der "virtuellen Rückdeformation". In: Weckenmann, A. (Hrsg.): Berichte aus dem Lehrstuhl QFM, Universität Erlangen-Nürnberg, Aachen: Shaker, 2011.

Google Scholar

[6] SFB/TR73: Umformtechnische Herstellung von komplexen Funktionsbauteilen mit Nebenformelementen aus Feinblechen – Blechmassivumformung-Erstantrag. Erlangen, 2008.

Google Scholar

[7] Ohrt, C.; Krauß, M.; Kästner, M.; Reithmeier, E.: Optimierung eines endoskopischen Streifenprojektionssystems, Vierter Workshop Optische Technologien, Proceedings, 2010.

Google Scholar

[8] Weckenmann, A.; Weickmann, J.; Hartmann, W.: Model and simulation of fringe projection measurements as part of an assistance system for multi-component fringe projection sensors. In: Duparré, A.; Geyl, R.: Proceedings of SPIE Vol. 7102, art. no. 71020N-1, (2008)

DOI: 10.1117/12.797600

Google Scholar

[9] GFMesstechnik GmbH: URL: http://www.gfmesstechnik.de.

Google Scholar

[10] Weckenmann, A.; Weickmann, J.; Hartmann, W.: Multi-component fringe projection sensors: Assistance system for short and robust inspection processes. In: 2008 NCSL International Workshop and Symposium (03.-07.08.2008, Orlando, FL, USA). - Proceedings on CD-ROM.

DOI: 10.1117/12.797600

Google Scholar

[11] Berndt, G.; Hultzsch, E.; Weinhold, H.: Funktionstoleranz und Messunsicherheit. In: Wissenschaftliche Zeitschrift der Technischen Universität Dresden, 17/2, 1968, S. 465-471.

Google Scholar

[12] VDI/VDE 2617, Part 8: Accuracy of coordinate measuring machines – Characteristics and their testing – Test suitability of measurements with cmm, Düsseldorf: Beuth, 2006.

Google Scholar